2. AWS Amazon Rekognition 입문 가이드 (이미지 작업하기)
* 이 포스팅은 https://developing-soosoo.tistory.com/49 와 이어지는 포스팅입니다
* https://docs.aws.amazon.com/ko_kr/rekognition/latest/dg/images.html 를 바탕으로 작성했습니다
* python을 이용합니다
지금까진 Amazon Rekognition을 사용하기 위한 준비 과정을 거쳤습니다.
이제부턴 정말로 Amazon Rekognition을 이용해 이미지를 작업해봅시다 !
우선 Amazon Rekognition이 무엇인지 알아볼까요
Amazon Rekognition이란?
Amazon Rekognition은 딥러닝 기술을 기반으로 하는 aws에서 제공하는 서비스로, 애플리케이션에 이미지 및 비디오 분석을 쉽게 추가할 수 있습니다.
Amazon Rekognition API에 이미지나 비디오를 제공하면 서비스에섯 객체,사람,텍스트 등을 식별할 수 있습니다.
매우 정확한 분석을 진행하기 때문에 다양한 사용 사례가 존재합니다.
Amazon Rekognition 사용 사례
- 검색 가능한 이미지 및 비디오 라이브러리
- 얼굴 기반 사용자 확인
- 개인 보호 장비 탐지
- 감정 및 인구 통계 분석
- 얼굴 검색
- 안전하기 않은 콘텐츠 감지
- 유명 인사 인식
- 텍스트 감지
- 사용자 지정 레이블
1. 이미지에서 레이블 감지하기
* 분석할 이미지를 S3 버킷에 업로드 해야합니다. (.jpg 또는 .png)
#Copyright 2018 Amazon.com, Inc. or its affiliates. All Rights Reserved.
#PDX-License-Identifier: MIT-0 (For details, see https://github.com/awsdocs/amazon-rekognition-developer-guide/blob/master/LICENSE-SAMPLECODE.)

import boto3

def detect_labels(photo, bucket):

    client=boto3.client('rekognition')

    response = client.detect_labels(Image={'S3Object':{'Bucket':bucket,'Name':photo}},
        MaxLabels=10)

    print('Detected labels for ' + photo)
    print()
    for label in response['Labels']:
        print ("Label: " + label['Name'])
        print ("Confidence: " + str(label['Confidence']))
        print ("Instances:")
        for instance in label['Instances']:
            print ("  Bounding box")
            print ("    Top: " + str(instance['BoundingBox']['Top']))
            print ("    Left: " + str(instance['BoundingBox']['Left']))
            print ("    Width: " +  str(instance['BoundingBox']['Width']))
            print ("    Height: " +  str(instance['BoundingBox']['Height']))
            print ("  Confidence: " + str(instance['Confidence']))
            print()

        print ("Parents:")
        for parent in label['Parents']:
            print ("   " + parent['Name'])
        print ("----------")
        print ()
    return len(response['Labels'])


def main():
    photo=''
    bucket=''
    label_count=detect_labels(photo, bucket)
    print("Labels detected: " + str(label_count))


if __name__ == "__main__":
    main()
* 이 때 photo와 bucket은 본인의 이미지 파일과 버킷 이름으로 변경해주세요

이렇게 뜨면 업로드 완료!

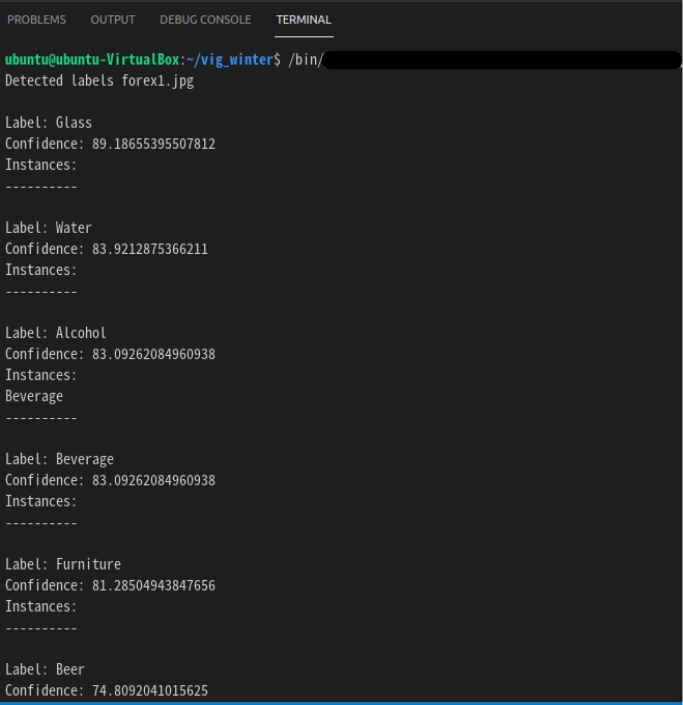
이런식으로 결과값이 출력되면 성공입니다 짝짝짝
2. 이미지에서 얼굴 감지하기
* 분석할 이미지를 S3 버킷에 업로드 해야합니다. (.jpg 또는 .png)
#Copyright 2018 Amazon.com, Inc. or its affiliates. All Rights Reserved.
#PDX-License-Identifier: MIT-0 (For details, see https://github.com/awsdocs/amazon-rekognition-developer-guide/blob/master/LICENSE-SAMPLECODE.)

import boto3
import json

def detect_faces(photo, bucket):

    client=boto3.client('rekognition')

    response = client.detect_faces(Image={'S3Object':{'Bucket':bucket,'Name':photo}},Attributes=['ALL'])

    print('Detected faces for ' + photo)
    for faceDetail in response['FaceDetails']:
        print('The detected face is between ' + str(faceDetail['AgeRange']['Low'])
              + ' and ' + str(faceDetail['AgeRange']['High']) + ' years old')

        print('Here are the other attributes:')
        print(json.dumps(faceDetail, indent=4, sort_keys=True))

		# Access predictions for individual face details and print them
        print("Gender: " + str(faceDetail['Gender']))
        print("Smile: " + str(faceDetail['Smile']))
        print("Eyeglasses: " + str(faceDetail['Eyeglasses']))
        print("Emotions: " + str(faceDetail['Emotions'][0]))

    return len(response['FaceDetails'])
def main():
    photo='photo'
    bucket='bucket'
    face_count=detect_faces(photo, bucket)
    print("Faces detected: " + str(face_count))


if __name__ == "__main__":
    main()
* 이 때 photo와 bucket은 본인의 이미지 파일과 버킷 이름으로 변경해주세요

이런식으로 나오면 성공!
3. 이미지에서 유명인사 인식하기
* 이 때, 유명인사 익신은 S3 버킷에 저장한 이미지가 아닌, URL로 사용합니다
#Copyright 2018 Amazon.com, Inc. or its affiliates. All Rights Reserved.
#PDX-License-Identifier: MIT-0 (For details, see https://github.com/awsdocs/amazon-rekognition-developer-guide/blob/master/LICENSE-SAMPLECODE.)

import boto3
import json

def recognize_celebrities(photo):


    client=boto3.client('rekognition')

    with open(photo, 'rb') as image:
        response = client.recognize_celebrities(Image={'Bytes': image.read()})

    print('Detected faces for ' + photo)
    for celebrity in response['CelebrityFaces']:
        print ('Name: ' + celebrity['Name'])
        print ('Id: ' + celebrity['Id'])
        print ('KnownGender: ' + celebrity['KnownGender'])
        print ('Smile: ' + celebrity['Smile'])
        print ('Position:')
        print ('   Left: ' + '{:.2f}'.format(celebrity['Face']['BoundingBox']['Height']))
        print ('   Top: ' + '{:.2f}'.format(celebrity['Face']['BoundingBox']['Top']))
        print ('Info')
        for url in celebrity['Urls']:
            print ('   ' + url)
        print
    return len(response['CelebrityFaces'])

def main():
    photo='moviestars.jpg'

    celeb_count=recognize_celebrities(photo)
    print("Celebrities detected: " + str(celeb_count))


if __name__ == "__main__":
    main()
저는 어벤져스 사진을 사용하겠습니다 (https://docs.aws.amazon.com/ko_kr/rekognition/latest/dg/images-s3.html)

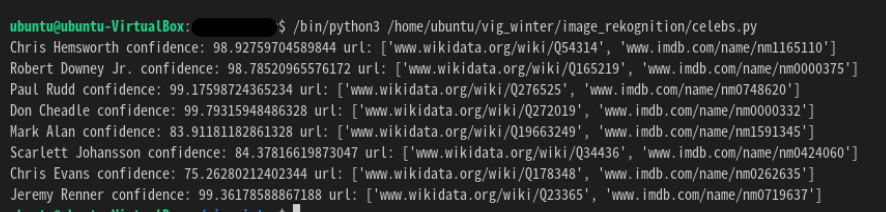
ㅉㅏㄴ~ 이렇게 결과가 나오면 성공입니다.! 대충 다 맞는거 같죠?
4. 이미지에서 텍스트 감지하기
#Copyright 2018 Amazon.com, Inc. or its affiliates. All Rights Reserved.
#PDX-License-Identifier: MIT-0 (For details, see https://github.com/awsdocs/amazon-rekognition-developer-guide/blob/master/LICENSE-SAMPLECODE.)

import boto3

def detect_text(photo, bucket):

    client=boto3.client('rekognition')

    response=client.detect_text(Image={'S3Object':{'Bucket':bucket,'Name':photo}})

    textDetections=response['TextDetections']
    print ('Detected text\n----------')
    for text in textDetections:
            print ('Detected text:' + text['DetectedText'])
            print ('Confidence: ' + "{:.2f}".format(text['Confidence']) + "%")
            print ('Id: {}'.format(text['Id']))
            if 'ParentId' in text:
                print ('Parent Id: {}'.format(text['ParentId']))
            print ('Type:' + text['Type'])
            print()
    return len(textDetections)

def main():

    bucket='bucket'
    photo='photo'
    text_count=detect_text(photo,bucket)
    print("Text detected: " + str(text_count))


if __name__ == "__main__":
    main()
저는 글귀가 적혀있는 밑에 사진을 사용해보겠습니다


WORD 도 LINE도 잘 나오네요! (아쉽게도 한글은 지원해주지 않습니다)
다음 포스팅에선 비디오를 이용해 작업해봅시다 !